
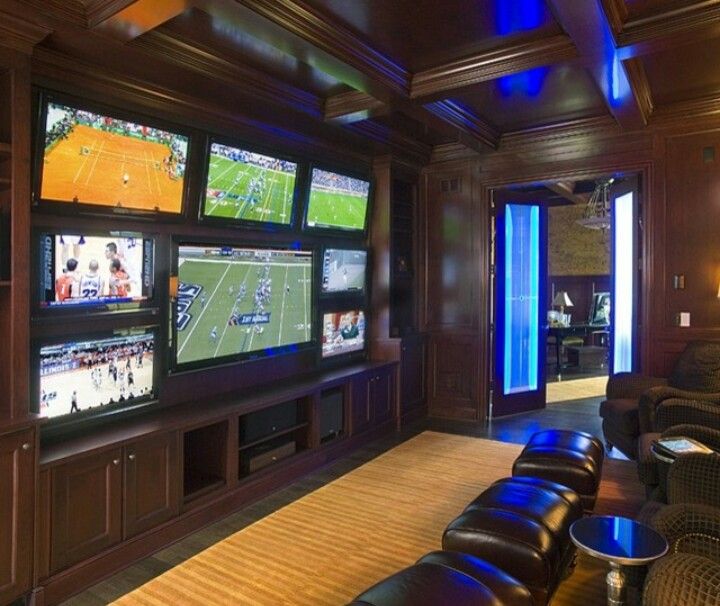
A man cave is a space where a man can unwind, relax, and enjoy his hobbies and interests without any distractions. It’s a place where he can escape from the stresses of the outside world and immerse himself in the things he loves. One of the coolest additions to a man cave is a video wall, which provides an immersive viewing experience that’s perfect for watching movies, sports, or playing video games. A video wall is a large display made up of multiple screens, arranged in a grid pattern to create one massive screen. This technology has become increasingly popular in recent years, thanks to advancements in display technology and the availability of high-quality content.
A video wall in a man cave not only enhances the entertainment experience but also adds a modern and sophisticated touch to the overall aesthetic of the room. With a video wall, a man can truly escape into his favorite movies, games, or sports events, and create an immersive viewing experience that’s unmatched by traditional displays. It is one of those killer elements of a man cave that will wow your guests.
What Things Should I Consider Before Embarking on a Video Wall In My Man Cave?
Before embarking on a video wall project in your man cave, there are several factors you should consider to ensure that you end up with the best possible setup:
- Space: Video walls can take up a significant amount of space, so make sure your man cave has enough room to accommodate the screens and any necessary equipment.
- Budget: Video walls can be expensive, so determine how much you’re willing to spend and stick to that budget.
- Content: Consider what kind of content you want to display on the video wall, such as movies, sports, or video games. Make sure the content you want to display is compatible with the technology you’re using.
- Display Technology: There are various types of display technology to choose from, such as LED, LCD, and projection. Each has its advantages and disadvantages, so research which type of display technology is best suited to your needs.
- Installation: Installing a video wall can be a complex process, so it’s important to hire a professional to ensure that the installation is done correctly.
- Maintenance: Like any piece of technology, video walls require regular maintenance to keep them functioning at their best. Consider the cost and frequency of maintenance when planning your video wall project.
By considering these factors, you can ensure that your video wall project is successful and meets your entertainment needs in your man cave.
How To Watch Multiple Programs on Your Video Wall
To watch multiple programs on your video wall, you’ll need a video wall controller. A video wall controller is a device that takes multiple video inputs and displays them on a single video wall as separate tiles.
Here are the steps to accomplish this:
- Choose a video wall controller: There are many different video wall controllers available on the market. Choose one that meets your needs and is compatible with your video wall and video sources.
- Connect your video sources: Connect the video sources to the video wall controller using the appropriate cables, such as HDMI or DisplayPort.
- Configure the video wall controller: Configure the video wall controller to display each video source as a separate tile on the video wall.
- Adjust the layout: Adjust the layout of the tiles on the video wall to your preference. You can choose the size and position of each tile.
- Control the video wall: Control the video wall using the video wall controller or a remote control. You can switch between different video sources or adjust the layout as needed.
By using a video wall controller, you can watch multiple programs on your video wall simultaneously, which is ideal for sports fans, gamers, or anyone who wants to watch multiple shows at the same time.
Will the Video Wall Controller Allow Sound to Come from Just One TV?
Yes, the video wall controller can be configured to allow sound to come from just one TV, rather than all the TVs in the video wall.
To accomplish this, you can connect the audio output of the video source to a separate audio system or an amplifier, and then connect the amplifier to the TV that you want to have sound. Alternatively, some video wall controllers have built-in audio processing that allows you to route the audio signal to specific displays.
Make sure to check the specifications of your video wall controller to ensure that it has the necessary audio input and output ports, and that it supports the audio formats that you require. Additionally, it’s important to ensure that the audio system you use is compatible with the video wall controller and the TV that you want to have sound.
With the right setup, you can have the audio coming from just one TV, while still displaying multiple programs on your video wall.
Is It Best to Use the Same Brand and Model of TVs on a Video Wall?
It is best to use the same brand and model of TVs on your video wall for several reasons:
- Consistency: Using the same brand and model of TVs ensures that each display has the same brightness, contrast, color accuracy, and other visual qualities. This creates a consistent viewing experience across the entire video wall, which is important for immersion and visual appeal.
- Compatibility: Different brands and models of TVs may have different connectors, resolutions, refresh rates, and other specifications, which can make it difficult to set up and control the video wall. Using the same brand and model of TVs simplifies the setup and ensures compatibility with the video wall controller and other components.
- Maintenance: Using the same brand and model of TVs makes maintenance easier, as you only need to keep track of one set of replacement parts, firmware updates, and other maintenance tasks. This can save time and money in the long run.
- Aesthetics: Using different brands and models of TVs on a video wall can create a disjointed and unprofessional appearance, which can detract from the overall aesthetic of the room. Using the same brand and model of TVs creates a clean and cohesive look that is visually appealing.
Overall, using the same brand and model of TVs on a video wall provides a consistent, compatible, and visually appealing viewing experience, while also simplifying maintenance and setup tasks.
How To Connect Cable or Satellite Service to Each TV On the Video Wall
To connect your cable or satellite service to each TV on your video wall, you’ll need to follow these steps:
- Connect the coaxial cable: Locate the coaxial cable that runs from your cable or satellite service provider to your home. Connect this cable to a coaxial splitter.
- Connect the splitter to the video wall controller: Connect one end of the coaxial splitter to the “Cable In” or “Antenna In” port on the video wall controller. This will allow the controller to receive the signal from your cable or satellite service provider.
- Connect the video wall controller to each TV: Connect the video wall controller to each TV using HDMI cables. Make sure to use HDMI cables that are long enough to reach each TV on the video wall.
- Configure the video wall controller: Use the video wall controller to configure the video wall layout and the input source for each TV. You can also adjust the picture settings for each TV to ensure a consistent viewing experience.
- Watch TV: Once the video wall controller is configured, you can use your cable or satellite remote to change channels and watch your favorite shows on each TV in the video wall.
Note that you may need additional equipment, such as a set-top box or DVR, to access certain channels or services. In this case, you’ll need to connect the set-top box or DVR to the video wall controller using an HDMI cable. You can then use the set-top box or DVR remote to access channels and services.
How Many TV’s Can Be Controlled by One Video Wall Controller?
The number of TVs that can be controlled from one video wall controller depends on the specifications of the controller and the TVs being used. In general, video wall controllers can support multiple displays and can be configured to display content across multiple screens.
Many video wall controllers support up to 16 displays, while others can support even more. However, the actual number of displays that can be supported will depend on factors such as the resolution of the displays, the refresh rate, the input sources, and the processing power of the controller.
As mentioned above, when using multiple displays, it’s recommended to use displays of the same model and brand, as this will ensure that the images are consistent across all screens. Additionally, the video wall controller should be capable of handling the resolution of all displays in the video wall.
Overall, the number of TVs that can be controlled from one video wall controller will depend on the specific capabilities of the controller and the TVs being used. It’s important to check the specifications of both the controller and the displays to ensure compatibility and determine the maximum number of displays that can be used.
Things to Avoid When Setting Up Your Video Wall
When setting up a video wall, there are a few things you should avoid to ensure that the installation goes smoothly and the display performs optimally. Here are some things to avoid:
- Using mismatched displays: It’s important to use displays that have the same size, resolution, and aspect ratio. Mismatched displays can result in distorted images, uneven bezels, and inconsistent color reproduction.
- Poor placement: The placement of your displays is crucial to the overall appearance and functionality of your video wall. Avoid placing displays in areas that receive direct sunlight, as this can cause glare and reduce visibility. Also, ensure that the displays are mounted securely to prevent them from falling or shifting.
- Insufficient ventilation: Displays generate a significant amount of heat, so it’s important to ensure that there is adequate ventilation around each display. Avoid stacking displays too closely together or mounting them in enclosed spaces where heat can build up.
- Using low-quality cables: The quality of the cables used to connect your displays can have a significant impact on the quality of the image displayed. Avoid using low-quality cables that are prone to interference, as this can result in a degraded image.
- Ignoring maintenance: To ensure that your video wall performs optimally, it’s important to perform regular maintenance. This includes cleaning the displays and checking for any signs of damage or wear and tear.
Overall, by avoiding these common mistakes, you can ensure that your video wall installation is successful and provides a high-quality display for your viewing pleasure.